Category Archives: Recipes

Gluten Free Protein Pancakes

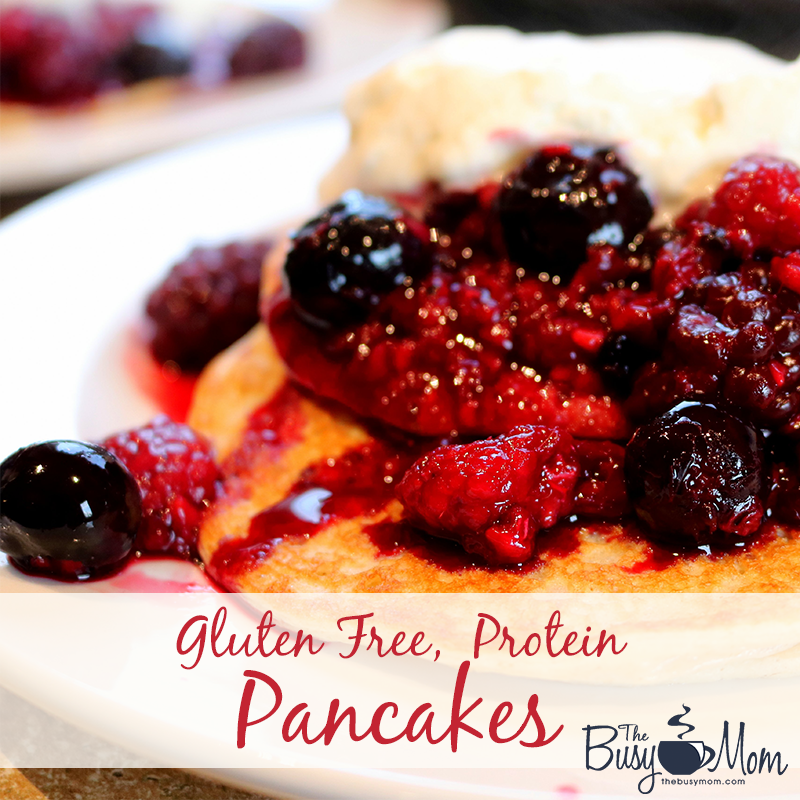
Breakfast is my favorite meal, and I have always loved pancakes with whipping cream and berries. Over the past four years, we have significantly changed the way we eat. With food sensitivities in our family, and with my slow thyroid, we have to be careful to get the right foods into our diets, and avoid consuming too many carbs. When I found this recipe, I was so excited because it meant that I could enjoy a meal I had always loved, with just a little twist on the ingredients. I have added my own little flare to it because I just can’t resist playing around with recipes to make them a little more personally enjoyable. These pancakes fit the criteria for our family in every way. They are gluten free, they taste good, they are appealing to the eye, they are light like a crepe, they have an excellent protein to carb ratio,  and they are filling and satisfying.

Gluten Free Protein Pancakes

Gluten Free Protein Pancakes

Ingredients

  • Topping -
  • Mixed berries pre-heated on stove
  • Whipping cream sweetened with stevia
  • Pancakes -
  • 1 cup gluten free oats
  • 1 cup cottage cheese
  • 1 cup egg whites
  • 2 tsp. aluminum free baking powder
  • dash of vanilla
  • dash of cinnamon
  • Dash of Himalayan Salt

Instructions

  1. To your blender, add the oats and blend into powder
  2. Add the rest of the ingredients and blend well.
  3. Spray a pre-heated griddle with coconut oil spray and add medium size circles of pancake batter. Usually six to eight pancakes will fit on a griddle. When batter bubbles, it's time to flip them. After cooking on second side, remove from griddle, top with berries and whipping cream and enjoy! Remember to spray the griddle with coconut oil spray in between batches.
https://heidistjohn.com/blog/recipes/gluten-free-protein-pancakes

We serve with mixed berries lightly sweetened with stevia, and we flavor the whipping cream with a dash of vanilla and stevia.

Options – 

    • To keep the carbs low, limit the amount of whipping cream you top your berries and pancakes with
    • For our family of seven, I triple the batch, use half of it, and refrigerate the rest for a second meal later in the week.

A healthy lifestyle is an important aspect to taking care of your body. God has only given us one body to house us while we are on this earth, and it matters greatly, how we care for it.

Caring for your body and feeding it well doesn’t mean you can only eat things you don’t like because they are good for you. God created food and intended it to be pleasurable as well. He is the creator of the taste bud, after all!  Researching new, healthy, recipes is one of my favorite past times and I have discovered many delicious new ways of preparing foods that my family loves. We don’t feel deprived because of our “limitations” due to foods we can’t eat, rather we see it a fun challenge to implement new ways to enjoy the core nutrition our bodies need for health and vitality.


“Or do you not know that your body is a temple of the Holy Spirit within you, whom you have from God? You are not your own, for you were bought with a price. So glorify God in your body.”    I Corinthians 6:19-20

“So, whether you eat or drink, or whatever you do, do all to the glory of God.”   I Corinthians 10:31

Simple, Satisfying Roast Beef Dinner

roast-beef

Roast is one of our favorite meals, and it’s one of the easiest meals to prepare.  I don’t know why I forget to make it. It’s delicious, satisfying, gluten free, and everyone in our family loves it!  With our busy schedules, I was looking for some easy recipes last week.  My goal is to simply life a little bit and cooking meals that fit the criteria for good nutrition was my project of the week.  I came across my favorite roast recipe and decided it was time to prepare it again.  Oh the aroma that filled our home as we came through the door with hungry tummies after a long and busy day!  I prepared sweet potatoes, asparagus, and green beans, pan fried in coconut oil to go with that succulent, tender, roast. Please excuse me while I wipe up the drool that just landed on my key board, and write roast on my grocery list…..again.

Ridiculously Easy Roast

Ridiculously Easy Roast

Ingredients

  • One roast of your choosing
  • mushrooms (as many as you like)
  • one large onion
  • Fresh, minced garlic (2 cloves)
  • one tablespoon coconut oil
  • Himalayan or sea salt to taste
  • Two bay leaves

Instructions

  1. In a large skillet, heat coconut oil, and add onion, garlic, and mushrooms. Sautee until onion is translucent, and mushrooms are browned and tender. Remove veggies and set aside.
  2. Add roast to the skillet and brown on all sides. Rub salt on each side of the roast, then add to the crockpot. Place veggies on top of roast and top with two bay leaves. Cook on high for seven hours (or according to your own crock pot's heat. Mine is very slow, so high works best). Remove bay leaf and serve!
https://heidistjohn.com/blog/recipes/simple-satisfying-roast-beef-dinner


Creamy Potato Soup

Being a full-time, working, homeschooling mom to three daughters means that some days it’s just way easier to grab lunch at a fast food restaurant. Yes, there are those lovely days that I come home and make sandwiches, pack them for my family, then return gracefully to the music store just in time for lunch.  But, then there are the busy days when I ignore my mommy guilt and just drive through for the box of nuggets!

Sometimes my girls do not agree on the chosen lunch options on these fast food days. Out of the three girls, you can almost be guaranteed that one will have an objection about the restaurant I am grabbing lunch from. However, there is one place I can count on to please everyone at lunch time. Schlotzsky’s. My middle daughter is particularly fond of their potato soup. It’s not surprising, really, since she’s our “carbs girl.” If I’d let her, that girl would live off of French bread, mac & cheese, Ramen noodles, and mashed potatoes!

creamy-potato-soup copy

Knowing how much she loves Schlotzsky’s potato soup, I decided I would try my best to replicate it. Of course she was thrilled when she learned that potato soup was what I would be making for dinner! When I was just about finished cooking the soup, I let her have a taste to see if it was good. She very carefully took a sip so as not to burn her mouth. Then, she hesitated and sweetly said, “Hmmm… it doesn’t taste quite the same as Schlotzsky’s.” 🙁 So I replied, “Oh. Okay, well, what do you think it needs?” (I later realized this was a good mom choice on my part, because it gave my daughter ownership to the soup.) So, she suggested more salt and a little cream. And, I think it did improve the taste. Yay!! The best part of the story though, is that my daughter was happy and thought it tasted like her favorite soup in the world!  Just to let you know though, this is NOT a copycat recipe.  It doesn’t taste exactly like Schlotzsky’s soup.  But, it’s close enough for a nine year old girl 🙂

Here is the recipe for my potato soup that made my little girl so happy.

Creamy Potato Soup

Creamy Potato Soup

Ingredients

  • 10 red potatoes
  • 4 gloves garlic
  • 1/2 stick butter
  • 1/2 cup cream
  • 1/4 cup milk
  • 8 cups water
  • 1 1/2 cups shredded cheddar cheese
  • 1 TB. sour cream
  • 1 tsp. ground pepper
  • 1 tsp. salt
  • 1/2 tsp. ground rosemary
  • 4 strips bacon
  • 1/2 tsp. onion salt or powder

Instructions

  1. Chop potatoes and mince garlic.
  2. Heat butter and garlic on high heat for 2 minutes in a medium size stew pot.
  3. Add potatoes and 8 cups of water, boil uncovered for 20 minutes on high heat.
  4. While potatoes are boiling, cook 4 strips of bacon in a skillet.
  5. When potatoes are tender, mash them to desired consistency. (don't drain water)
  6. Reduce to medium low heat and add cheese, sour cream, salt, pepper, onion salt, rosemary, cream and milk.
  7. Simmer for 5 minutes on low heat until soup thickens.
  8. Serve with shredded cheese and bacon crumbles.
https://heidistjohn.com/blog/recipes/creamy-potato-soup

Easy Mexican Chicken Wraps

If you are looking for a nutritious, delicious, simple, and quick recipe to feed a crowd, you’ve come to the right place!

Lately I feel like I see myself flying by and I stand there wondering about that flash that whizzed past. Between keeping up with the schedules of five active children, school, volunteer time outside the home, seeing my nine grandblessings and their parents as often as possible, church activities, grocery shopping, a small photography obsession, the upkeep of a home, and the myriad of other responsibilities, I seriously began to question whether or not I could remember how to cook. We are much more on the go than we have ever been before, which translates to very little time left to plan and prepare healthy, satisfying, meals. They say that necessity is the mother of invention. I am finding that to be true. In this season of life with grown kids, nine grandblessings, and five kids that range in age from nine to sixteen in the house, there are days I feel stretched too thin to be of much use to anyone.  Leaning on the Lord for extra strength and wisdom is not an option. It’s mandatory. In my weakness, He is proving to be strong. He is giving me wisdom far beyond my own, creativity I didn’t even know existed within my soul, and strength to not just make it through each day, but to embrace and enjoy the moments in spite of physical exhaustion.

In one of those recent moments when my physical tank was on empty, God met me right there with fuel to fill it up and get me going again. Clarity of thought broke through the shadows in my foggy brain and out came this amazing meal that my family fell in love with. God is so good, so faithful, and so very real. He takes my breath away with His incredible way of meeting me right where I am and I can’t resist sharing this delicious, simple, meal with you. Veggies and meat all in one dish? I’ll take it!

The kids are begging me to make it regularly. Once again….it’s a win for Mom!

mexican-chicken-wraps-recipe

The beauty of this recipe is the ability to create a small, medium, or large batch with ease, hence the vague measurements. You can be creative with the flavors to fit your own taste. This can also be baked in an oven, or you can make a crock pot meal out of it.

Easy Mexican Chicken Wraps

Easy Mexican Chicken Wraps

Ingredients

  • chicken tenders (you choose the amount for your crowd)
  • red, yellow, and orange bell peppers, diced
  • one medium yellow or white onion, diced or julienned
  • shredded green cabbage
  • guacamole
  • shredded pepper jack cheese
  • Mexican seasoning:
  • cumin (to taste)
  • chili powder (to taste)
  • 1-2 limes
  • green onions (chopped)
  • 1-2 tsps. Himalayan salt
  • salsa to taste
  • 2-4 cloves of fresh, minced, garlic

Instructions

  1. Mix cumin, chili powder, lime juice, salt, half the garlic and salsa together in a small bowl
  2. Add chicken tenders to a casserole dish (I used an 11x14 for my crowd)
  3. Lightly salt each chicken tender, than pour seasoning over the batch and bake in a 350 degree oven until chicken is cooked through (45 minutes-1 hour).
  4. About fifteen minute through the baking time, begin preparing the onion and cabbage by adding 1-2 tablespoons coconut oil to the skillet, and sautéing the onion and cabbage with fresh garlic.
  5. Once the chicken is fully cooked, you can add it to warmed tortillas and top it with guacamole, grated cheese, the sautéed onion and cabbage, fresh, chopped tomatoes, or a combination of topping choices you enjoy most. OR you can serve it sans the tortilla, with brown rice and all the toppings.
  6. We used gluten free corn tortillas fried in coconut oil, for ours, but if going gluten free is not a necessity for your crowd, warmed flour tortillas are yummy and easy to warm in the oven.
  7. The veggies for this can be chopped up ahead of time, for an even quicker preparation process on a busy day.
https://heidistjohn.com/blog/recipes/easy-mexican-chicken-wraps
 

Enjoy!

Proverbs 3:5-6

“Trust in the Lord with all your heart,
    and do not lean on your own understanding.
 In all your ways acknowledge him,
    and he will make straight your paths.”


Gluten Free Pad Thai {YUM}

Pad_Thai_Cover


So, last summer, my friend Jane was using a spiralizer while I was visiting and I was fascinated. We’ve been gluten-free in our home for about 18 months and the idea of using veggies for noodles seemed like something I should try. I’m so glad I did! This recipe is totally authentic tasting, because the sauce is fabulous, too.

I thought for sure the kids would make faces and squirm at the idea of zucchini noodles. Let me just say: there were NO leftovers. Everyone loved it, even the five year old and my mother in law. Believe me, your whole family will love it. #winning

This recipe works exactly the same way with traditional pad thai noodles, too.

Here’s the recipe!

Serves 8-10
Ingredients:

Pad Thai with Zucchini Noodles (Kids love it too!)

1 lb chicken (I used the meat from a Costco roasted chicken that we happened to have.)
2 TB minced garlic
1-2 red bell peppers
1-2 eggs (depending on how much you like egg in your pad thai. We used two)
1 bunch cilantro
2-4 large zucchini or 4-5 small
1/2 cup chopped peanuts (optional but de-lish)

I’ll show you the sauce recipe below.

Here’s how to do it:

Zucchini noodle pad thai that your whole family will love!


  1. Put some sesame oil into your skillet and cook the spiralized noodles until they’re soft.
  2. Remove the noodles and put them in a strainer with some paper towels. Make sure the liquid gets strained off.
  3. Add the garlic and red pepper, and 1/4 of the chopped cilantro. Sauté until tender.
  4. Turn up the heat a little and add the eggs.
  5. Add the noodles back. Cook for about 2 minutes.
  6. Add HALF the sauce and cook until bubbly. If you need more sauce, add it until it’s the consistency you like.
    I ended up with too much sauce the first time, and adjusted the recipe here but I discovered something: I could add edemame noodles to the sauce and it soaked up the extra sauce and added incredible flavor and texture to the dish. So I learned something!
  7. Add more cilantro and some crushed peanuts. Stir together, heat through and serve!

Top with cilantro and peanuts if desired.

Pad Thai Sauce:

Pad Thai Sauce Recipe


1/4 cup each:

  1. rice vinegar
  2. fish sauce
  3. brown sugar
  4. soy sauce (we used gluten free)
  5. lime juice
  6. siracha (omit or use less if you want milder sauce)

I know I said that I love crock pots and Mexican food, but from now on, You can call me Dragon Lady.

Enjoy!
Heidi

Cauliflower Bacon Casserole

Alright. I’m taking a little, tiny break from my slow cooker today. If you have kids who don’t like cauliflower, I’m here to win them over to the right side. This recipe is a WINNER! I know this because every.single.one. of my kids went back for seconds and I didn’t have leftovers. Yeah. That’s how I know.

I’ve been replacing potatoes with cauliflower for the past several years, and it’s been a good change. So probably the bacon isn’t that good for us—but once in a while—okay. Nevermind. I eat bacon whenever I can. #truestory

Bacon cauliflower casserole that your kids will LOVE

Serves 8-10
INGREDIENTS:

3 chicken breasts, cubed and cooked
2 head of cauliflower (I had a little leftover but 1 head would have been too little.)
1 tablespoon diced garlic, or to taste
2 cups shredded cheddar cheese
2 cups shredded Monterey jack cheese
bacon pieces (as much as you like) but I did about a cup or so. That’s because I was eating it as I went.

Cheesy cauliflower casserole with BACON

DIRECTIONS

Preheat oven to 350 degrees

Cook cauliflower until tender. DO NOT OVERCOOK. I cook mine in very hot water for about 10 minutes. The trick here is to let the water drain off, so while you’re prepping the rest of the dish, set it in a colander to cool and drain.

While cauliflower is cooking, add cheeses, bacon and garlic to a big bowl.

Cook chicken.

Add cooked check to the bowl and mix well. Then, add the cooked cauliflower.
Cauliflower casserole


mixitup


Dump it into a greased glass 9×13 casserole pan. If you don’t have a glass dish, don’t sweat it.
Cover with foil and cook for about 25 minutes. You want it nice and steamy.

Cauliflower Bacon Casserole
I served ours with a delicious spinach salad. I chose to withhold bacon from the salad, but hey—do what you need to do!  If your kids are like mine, they will love this and so will your husband. It’s a crowd-pleaser!

Enjoy~
heidi

EASY Slow Cooked Chicken Chipotle Fajitas

You guys.

I wish my blog could send you a whiff of my kitchen right now. It’s amazing. If I didn’t know better, I would say my heritage is south of here because I’m a lover of all things Mexican. Give me a taco and I’m a happy girl. I also love my slow cooker. In fact, my love-affair with slow cooking is just north of sinful. 🙂 Anyway! This is my new go-to recipe for Mexinight over here. Not only is it totally de-lish, but it works fantabulously well in my beloved slow cooker.

So, if you like fajitas and you’re addicted to slowcooking like me, this might be the answer to all your food prayers.
You’re welcome.

A slow cooked version of an old standby: FAJITAS!

You’ll need

  • 2-3 chicken breasts
  • 3 bell peppers (I used one each of every color they had.)
  • 1 onion (I used yellow but white would be fab, too.)
  • 2 tbsp diced garlic
  • 1 lime
  • taco seasoning
  • chipotle peppers (If you like the chipotle part. Otherwise, omit them.)
  • toppings (cilantro, sour cream, etc)
  • corn tortillas

Slice the peppers into long, thin pieces. Put half into the slow cooker.

Slow cooked chipotle chicken fajitas

Add the half your onion and garlic.

Dice chicken (I use Zaycon, and when I’m processing the chicken, I dice nearly 90% before freezing.) and place into a bowl. Put as much taco seasoning as you like. I’d say 1/8 cup would work.

Add the sauce from a small can of chipotle peppers. Stir to cover the chicken with the seasoning. You can add a few of the chipotle peppers, too, but I save mine for salsa.

Put the seasoned chicken in your slow cooker and cover it with as much garlic as you like. 🙂

easy slow cooked chipotle chicken fajitas

Add the rest of your peppers and onions.

Squeeze half your lime out all over the chicken. Try to contain yourself. It will smell good by now.

Notice my little lime-squeezing trick? Yes. My 12 yr old taught this to me. #truestory

Life Hack: squeezing a lime

Cover the limey goodness with the rest of the peppers and onions

easy slow cooked chicken fajitas

JUICE THE OTHER HALF OF THE LIME NOW. Mmmmmm. Now we’re talking.

Cook on high for 3-4 hours or low for 5 hours.

Give it a good stir every two hours.

easy_title Slow cooked EASY chicken fajitas

Before serving, shred chicken and then dump the mixture into a colander to drain off any liquid. I save the liquid and use it in taco soup later. (Yum.)

Serve over warmed corn tortillas with any toppings that suit your fancy. Don’t forget the guac and Mexican music!

From our house to yours,
signature-heidistjohn


EASY Slow Cooked Chicken Chipotle Fajitas

EASY Slow Cooked Chicken Chipotle Fajitas

Ingredients

  • Chicken
  • 3 bell peppers (I used one each of every color they had.)
  • 1 onion (I used yellow but white would be fab, too.)
  • 2 tbsp diced garlic
  • 1 lime
  • taco seasoning
  • chipotle peppers (If you like the chipotle part. Otherwise, omit them.)
  • toppings (cilantro, sour cream, etc)
  • corn tortillas

Instructions

  1. Slice the peppers into long, thin pieces. Put half into the slow cooker. Add the first half your onion and garlic.
  2. Dice chicken (I use Zaycon, and when I'm processing the chicken, I dice nearly 90% before freezing.) and place into a bowl. Put as much taco seasoning as you like. I'd say 1/8 cup would work.
  3. Add the sauce from a small can of chipotle peppers. Stir to cover the chicken with the seasoning. You can add a few peppers, too, but I save mine for salsa.
  4. Put the seasoned chicken in your slow cooker and cover it with as much garlic as you like. 🙂
  5. Add the rest of your peppers and onions.
  6. Squeeze half your lime out all over the place.
  7. Cover the limey goodness with the rest of the peppers and onions.JUICE THE OTHER HALF OF THE LIME NOW. Mmmmmm. Now we're talking.
  8. Cook on high for 3-4 hours or low for 5 hours.
  9. Give it a good stir every two hours.
  10. Before serving, shred chicken and then dump the mixture into a colander to drain off any liquid. I save the liquid and use it in taco soup later. (Yum.)
  11. Serve over warmed corn tortillas with any toppings that suit your fancy. Don't forget the guac and Mexican music!
https://heidistjohn.com/blog/recipes/easy-slow-cooked-chicken-chipotle-fajitas